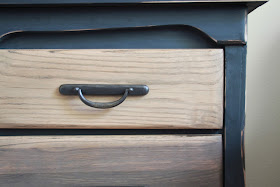
I was actually getting to the point of annoyance when someone would say, "Hey I have this piece of furniture I don't want. You want it for free?" Just kidding. I wasn't really annoyed, but instead totally grateful and excited when some friends and acquaintances gave me more pieces to re-do however I wanted (they are coming soon); but I was hoping to have no other project (potential money maker) to come my way so that I could justify my time and attention on the eye sore in my boys' room.
Anyway, enough talking, here's how it went down...
Because I am impatient I sanded the drawers down using my Craftsman belt sander that had 80 grit sandpaper on it (probably not what a belt sander is meant for). Then I used my Makita palm sander starting with 60 grit for the edges and corners that my belt sander neglected. I then went to 150 grit and then 220 for the drawers to be super soft and smooth.
I used 220 grit sandpaper and just hand sanded the dresser (in the direction of the grain) and then wiped it down. The picture is pre-wiping down.
I then wanted slightly weathered looking wood drawers and rather than spend money on stain I went with what I had on hand...plain ol' vinegar and Brillo pads. I wasn't sure how much to use of either so I just shoved 4 pads through the vinegar bottle opening (which had about 2 cups of vinegar left in it). I let the concoction sit for a day and then used a brush and painted on a very thin amount of it on a drawer and then used an old bib to wipe it right off (note: I have a TON leftover. I probably only used 1/8 C of the concoction for all of my drawers) . At first it just looks like you got your wood wet, but give it a few minutes to dry and it turns gray. Craziness! Unfortunately since I was getting raw wood wet I had to then sand it with 220 grit paper again to make it super smooth. If you went the stain route you could skip that extra step.
I then used Chalkboard paint that I had on hand from a number of projects ($8-10 a quart? not sure what 30 oz is) and rolled it on the dresser with a mini foam roller. I didn't necessarily want the chalkboard ability on this dresser, but I love how the paint looks. It has somewhat of a blueish gray hue and when I barely sanded it down (after the paint had dried) to smooth out the little bumps in the paint, it made it look more chalky. I felt like it resembled Restoration Hardware's look a little and made it seem industrial almost.
I put a grayed drawer in and a non-grayed drawer in to see what look I liked better. I also had to get Facebook feedback too and love how my friends and peeps pull through with their opinions. The opinions were somewhat mixed. I decided I wanted the drawers somewhat weathered but not too gray since the dresser was a bluish gray and I wanted more of a separation of the two. I then made a very watered down brown paint mixture and wiped it on and rubbed it off to bring more brown out. (Again I had to use the 220 sandpaper to bring the softness back. Annoying.) Once the drawers were dry I used my General Finishes clear top coat in the satin finish to protect the drawers.
To make the dresser match the look of the drawers a little bit more, I used my palm sander with 100 grit sandpaper and sanded down the edges.
Lastly I used the last of my oil rubbed bronze spray paint for the hardware and put the pulls back on the drawers. Voila! All done! I just love how it has an industrial/rustic feel. Perfect for a boys room I think. Now I just need to decorate the room to match!
Thanks,


